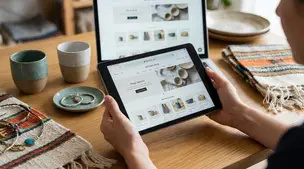
Notion for Etsy Sellers: Build a Simple Shop Dashboard (Tasks + Notes)


A Notion shop dashboard gives your Etsy work a single home, so daily decisions take seconds instead of scrolling and second-guessing. It’s one page that pulls in linked databases for Tasks and Notes, filtered to show what’s due today and what’s coming up this week. Keep the task list lean with a Status and due date, plus a few tags like orders to ship, messages to answer, and listings to refresh; use the notes area as a quick capture spot for ideas, customer quirks, and process fixes. The common mistake is building a beautiful system that hides the next action, not the one that makes you money.
Notion shop dashboard layout that stays one screen
Pages and blocks to include
Start with a tiny Notion workspace that has just three core pages:
- Dashboard (this is the only page you live on daily).
- Tasks database (everything you need to do for your Etsy shop).
- Notes database (everything you want to remember, reuse, or turn into a task later).
On the Dashboard page, add only a few blocks. The goal is a clean “control panel,” not a second brain.
Include:
- A short header like “Today in the shop.”
- A linked view of Tasks filtered to Today (or Due next).
- A linked view of Notes filtered to Inbox (quick capture).
- A small “Quick links” block with 3 to 6 links you actually use in Etsy (Shop Manager, Orders, Messages, Listings).
Keep the Tasks and Notes databases as separate pages so you can open them when you want to plan or search. But day to day, you should work from the linked views on the Dashboard.
What to keep above the fold
Above the fold should answer one question: “What should I do next for my Etsy shop?”
A simple order that stays readable:
- Today Tasks (top priority, always visible).
- This Week (or Next Up) tasks (so you can batch listings, photos, or admin work).
- Notes Inbox (so ideas and customer details do not get lost).
Avoid putting big tables, long instructions, or aesthetic widgets at the top. If it doesn’t help you ship orders, respond to messages, improve listings, or market products, it can live further down the page.
Mobile-friendly dashboard choices
If you check your dashboard on your phone, design for one column. Two and three-column layouts look great on a laptop, but they turn into lots of scrolling on mobile.
A few mobile-safe choices:
- Use list views for Tasks and Notes. Hide extra properties you do not need on the go.
- Prefer short filters like Today, This Week, and Inbox.
- Keep “Quick links” as a short list. It is faster than hunting through bookmarks when you are answering Etsy messages between errands.
Simple Tasks database for Etsy work (properties and statuses)
Bare-minimum properties to add
Your Tasks database should feel like a simple to-do list that understands Etsy work. Keep it lean so you actually use it.
At minimum, add these properties:
- Task (Title): the action you can complete in one sitting, like “Reply to message about sizing” or “Update photos for Strawberry Mug listing.”
- Status (Select): the one field that drives your views.
- Due (Date): use this for anything tied to shipping dates, restocks, or promos.
- Area (Select): a small set of categories such as Orders, Messages, Listings, Photos, Marketing, Admin.
That’s enough to run “Today” and “This Week” views without turning every task into a mini project.
Statuses that fit Etsy task flow
Etsy sellers juggle a mix of reactive work (orders and messages) and proactive work (listings and marketing). A good status set makes both feel manageable.
A practical status flow:
- Backlog: good ideas, not committed.
- Next: queued up for the next work session.
- Today: what you will actually do now.
- Waiting: blocked by something external (customer reply, supplier, a photo you still need).
- Done: finished.
If you want one Etsy-specific status, add Scheduled for tasks tied to a launch date or sale start. Otherwise, keep it simple. Most sellers struggle from too many statuses, not too few.
Optional properties worth adding
Add optional properties only when you feel the pain of not having them.
Helpful upgrades:
- Etsy link (URL): paste the listing URL, order page, or a draft you’re editing.
- Order ID (Text): quick reference when you’re bouncing between Notion and Shop Manager.
- Priority (Select): Low, Medium, High, for weeks when everything feels urgent.
- Estimate (Number): a rough minutes estimate to make batching easier.
- Repeat (Checkbox): for recurring tasks like “Review renewals” or “Update shop announcement.”
Task views that make daily work easy (Today, Week, Backlog)
Today view with quick filters
Your Today view should be a short list you can finish. In Notion, create a linked database view of Tasks and filter it so it only shows items you can act on right now.
A clean setup:
- Filter Status is Today.
- Also show tasks that are Due is today (in case you forgot to tag them). If that creates duplicates in your workflow, pick one rule and stick with it.
- Hide properties except Status, Due, Area so the list stays scannable.
Sort by Due ascending, then by Area if you like grouping (messages together, then orders, then listings). When you sit down to work, your only job is to move tasks through Status: Next to Today to Done.
This Week view for batching
Etsy work gets easier when you batch similar tasks. The This Week view is where you plan those batches without cluttering Today.
Try this approach:
- Filter Due is within the next 7 days (or use your calendar week, Monday to Sunday, if that matches your routine).
- Exclude Status is Done.
- Group by Area so you can see blocks like Listings, Photos, and Marketing.
This view is perfect for planning one focused session, like “photograph new products,” “write three listing descriptions,” or “refresh tags on older listings,” then pulling only a few of those tasks into Today.
Backlog view for later
Backlog is your parking lot for ideas and “someday” improvements that still matter for your Etsy shop. The goal is to capture them without letting them hijack your day.
Set it up simply:
- Filter Status is Backlog.
- Sort by Created time descending (new ideas on top) or by Area if you tend to review by category.
When you do a weekly review, promote the best items from Backlog to Next. If something sits in Backlog for months and still doesn’t feel worth doing, archive it or mark it Done with a note like “Not needed.” A clean backlog is a useful backlog.
Notes system for Etsy sellers: inbox, tags, and templates
Quick-capture Notes inbox
Your Notes database is where everything goes before you decide what it is. A buyer message detail you do not want to forget. A packaging tweak. A listing title idea. A reminder that a certain varnish brand worked better than the last one.
Set up a Notes inbox so capture is frictionless:
- Keep a default Status: Inbox (or a simple checkbox like “Processed”).
- Add a Note title that starts with an action cue or topic, like “Customer asked about gift note options” or “Idea: bundle listing for best-sellers.”
- If it relates to something specific, add a Listing field (text or URL) so you can jump back to the right Etsy listing later.
The win here is speed. You can dump thoughts into Notes in seconds, then decide later whether they become tasks.
Tagging notes without overdoing it
Tags are useful until they become a second job. Start with 6 to 10 tags that match real Etsy seller situations, not abstract categories.
Good starter tags:
- Customer (preferences, sizing questions, edge cases)
- Custom order
- Listing SEO (titles, tags, attributes to test)
- Photos
- Packaging
- Shop policies
- Supplier / materials
- Ideas
If you are unsure which tag to use, skip tags and rely on search. Notion search is often faster than perfect tagging.
Note templates for common shop situations
Templates keep your notes consistent, which makes them easier to scan later. Create 3 to 5 that you will actually use:
- Custom order brief: customer request, measurements, materials, deadline, price notes, what you promised in Etsy messages.
- Listing refresh: what feels weak (photos, first line, keywords), what you will test, and the date you changed it.
- Customer issue log: what happened, what you offered, outcome, and what to change in your process.
- Content idea: hook, product angle, keywords to include, and the link to the Etsy listing you will feature.
When a note starts turning into work, you can convert it into a task later without losing the context.
Linking tasks and notes without building a complex system
Convert a note into a task
When a note turns into real work, the fastest move is to promote it without rewriting everything.
Two simple options work well for Etsy sellers:
- Copy the note title into a new Task, then paste the key details into the task description. This is perfect for “refresh listing photos” or “follow up with customer about sizing.”
- Keep the note as the source of truth, and create a task like “Complete: Custom order brief (see note).” This is great when the note contains lots of context from Etsy Messages, like deadlines, personalization details, or what you already promised.
Either way, end by changing the note’s status from Inbox to something like Processed, so your Notes inbox stays clean.
Link a task to a supporting note
Keep relationships optional, not required
If you want light structure, add a Relation property between Tasks and Notes. Name it something obvious, like “Related note” on Tasks and “Related task” on Notes. Then link only when it helps.
Use links for high-context work, such as:
- A tricky customer request where you want the full message summary handy.
- A listing SEO experiment where you want to record what you changed and when.
- A packaging or production change you want to repeat consistently.
Skip links for quick, low-stakes tasks like “Respond to message” or “Print shipping labels.” The best system is the one you still use during busy Etsy weeks.
How to set up the dashboard in Notion fast
Create databases and add them to a dashboard page
Create three top-level pages in Notion: Dashboard, Tasks, and Notes.
Then set up the two databases as full pages:
- On the Tasks page, create a database (table view is fine) named “Tasks.”
- On the Notes page, create a database named “Notes.”
Keep each database simple at first. You can always add properties later. The biggest time saver is separating “where you work” (Dashboard) from “where everything lives” (the full Tasks and Notes databases).
On the Dashboard page, add a short header and a small “Quick links” area for the Etsy pages you open constantly (Orders, Messages, Listings). That’s your one-screen home base.
Build linked database views for Tasks and Notes
On the Dashboard, insert linked database views (so you’re viewing the same Tasks and Notes, just filtered).
Create three views:
- Today (Tasks): filter to Status = Today (and/or Due = today), hide extra properties, sort by Due.
- This Week (Tasks): filter to Due within the next 7 days, exclude Done, group by Area if you like batching.
- Notes Inbox: filter to Status = Inbox (or Processed is unchecked), sort newest first.
Tip: use list view for the Dashboard. It stays readable on mobile and doesn’t turn into a wide spreadsheet.
Add buttons for quick add entries
Add one or two quick-add options so capture takes seconds:
- A New Task button that creates a task and pre-fills Status (like Today or Next) and an Area.
- A New Note button that creates a note with Status = Inbox and a simple template prompt (for example: “What happened? What’s the next step?”).
If your Notion setup doesn’t include buttons, you can get almost the same result with database templates inside Tasks and Notes. The goal is the same either way: fewer clicks, faster capture, and more time spent on real Etsy work.
Keeping the dashboard fresh with a daily and weekly routine
Daily triage for tasks and notes
Open your Notion dashboard at the start of each work session and do a quick reset. Five minutes is enough.
First, handle time-sensitive Etsy work. Check Orders and Messages. If you spot something that requires follow-up, add a task right away and keep the wording action-based, like “Confirm personalization details with buyer” or “Print label and pack Order #1234.”
Then clean up your task list:
- Move anything you will do next into Today.
- Push anything that can wait into Next (or leave it in This Week).
- Switch blocked items to Waiting so they stop staring at you.
Last, empty your Notes inbox. If a note is actionable, convert it into a task. If it’s reference only, tag it and mark it processed. The goal is a dashboard that tells you what to do, not a dashboard that stores guilt.
Weekly review to clear backlog and inbox
Once a week, do a 20 to 30 minute review. Pick a consistent day and time so it becomes automatic.
Start with Backlog. Promote a small number of tasks into Next based on what will move your Etsy shop forward. For many sellers, that’s a mix of listings, photos, and customer experience fixes. If you need ideas for seasonal priorities, it helps to scan the Etsy Seller Handbook and pull one or two actions into your plan.
Then review Notes. Look for repeated issues (shipping questions, sizing confusion, packaging damage) and create one process improvement task to prevent the problem next week.
Optional next steps (only if you need them)
If your shop is growing and the basics are working, add structure slowly:
- A simple “Projects” tag for bigger efforts like “New collection launch.”
- A Calendar view for deadlines, promos, and restocks.
- A lightweight recurring task system for weekly listing refreshes or customer service checks.
Only add these when you feel a real need. A simple Notion dashboard that you use beats a perfect one you avoid.
Related posts
Keep reading
Etsy Featured Listings: How to Curate Your Shop Homepage
Etsy featured listings help spotlight bestsellers on your Shop Home; pick 4 (or sections), order them for cohesive photos, and rotate a queued set for seasons.

Selling Jewelry on Etsy: Metal Disclosure and Allergy Considerations
Selling jewelry on Etsy: List exact metals, flag nickel sensitivity, and support hypoallergenic wording with supplier docs or testing to reduce buyer issues.
How to Use Etsy “Materials” and “Occasion” Fields Strategically
Etsy Materials and Occasion fields can boost visibility when chosen for buyer filters; match category, avoid guesswork, and align tags with real intent.

Etsy SEO Tips to Rank Higher in Search
Happy Etsy SEO tips for sellers: master keywords, titles, tags, photos, reviews, free shipping, and conversions to rank higher in Etsy search and boost sales.
How to Add Variations on Etsy Without Confusing Buyers
Add variations on Etsy with clear option names, linked photos, and accurate price/stock settings so buyers choose fast and orders stay correct at checkout.
Business Cards for Etsy Sellers: What to Print (and What to Avoid)
Business cards for Etsy sellers: smart basics like shop link or QR code, logo, and socials, with cardstock tips and pitfalls like clutter and pushy review asks.