What to Do Before You Open an Etsy Shop


Before you hit publish, an Etsy shop works best when the basics are decided, documented, and ready to run on day one. It’s a marketplace storefront for handmade, vintage, and craft-supply items, and early setup affects search visibility, buyer trust, and how smoothly orders go out. Nail your niche and product line, calculate pricing with fees, materials, and shipping, and batch-create strong product listings with clear photos, titles, and tags. Then choose a shop name, set up Etsy Payments and billing, and write simple shop policies for processing times, returns, and custom orders, because the biggest early headache is usually something boring you forgot to decide upfront.
Product and niche ideas that sell well on Etsy
Research demand using Etsy search suggestions
Start with real shopper language. In Etsy’s search bar, type a broad phrase that fits your product idea (like “silver earrings” or “nursery print”). Pay attention to the autocomplete suggestions. Those are often the clearest clue to how buyers describe what they want, which matters for Etsy SEO later.
Build a simple keyword list as you go. Include the core product term, plus a few “long-tail” phrases that add a style, material, or recipient (like “minimalist,” “sterling,” “gift for mom”). Long-tail keywords usually bring in fewer searches, but higher intent shoppers. Etsy’s own guidance on keywords and tags is worth skimming early, because it shapes how you’ll name and position your items: Keywords 101: Everything You Need to Know.
Define your ideal customer and style
A niche sells better when it’s specific. Instead of “candles,” think “clean, modern soy candles for new apartment gifts,” or “witchy, gothic candles for altar decor.” This helps you make consistent decisions about your product line, photo styling, and brand voice.
Write a one-sentence buyer snapshot you can keep next to your workspace: who they are, what they’re shopping for, and why. Then choose 3 to 5 style words that describe your shop (minimal, coastal, playful, vintage-inspired, etc.). These style words become repeatable keywords and guide your color palette and props.
Validate competition and stand-out factors
Before you commit, click into the top results for your target phrases and scan the first page. You’re looking for patterns: common price ranges, photo styles, shipping promises, personalization options, and what “best sellers” seem to include.
Then decide how you will stand out without racing to the bottom on price. Strong differentiation can be clearer materials, a tighter aesthetic, better gifting details, faster processing, or a more specific audience. Etsy’s Seller Handbook frames this as finding your competitive advantage: What’s Your Competitive Advantage?.
Shop name, branding, and storefront basics to set first
Choose a memorable shop name and shop title
Your shop name is more than a label. It becomes part of your Etsy shop URL, shows in search results, and is what past buyers will try to remember. Keep it short, easy to spell, and easy to say out loud. If someone hears it once, they should be able to type it later without guessing.
On Etsy, shop names have practical limits too. For example, you cannot use spaces or punctuation, and the name must be 20 characters or fewer. That reality should shape your brainstorming early.
Your shop title is different. It can be more descriptive, so use it to clarify what you sell and who it’s for. A simple formula works well: product type + style/material + gift/recipient angle. This helps shoppers instantly “get it” when they land on your storefront.
Create a cohesive logo, banner, and shop icon
Branding on Etsy is mostly about consistency, not fancy design. Choose one clear logo or wordmark, a shop icon that stays readable when it’s tiny, and a banner that matches your photo style. Aim for the same colors and vibe across listing photos, packaging, and your storefront graphics.
If you want a quick starting point, Etsy’s guide to customizing the look of your shop home includes practical tips like designing an icon that scales down well and using the correct banner dimensions.
Write your shop announcement and About section
Your shop announcement should answer the “before I buy” questions fast: what you sell, your current processing times, and anything shoppers should know about custom orders or seasonal cutoffs. Keep it scannable.
In your About section, focus on trust and clarity. Share what you make, how you make it (at a high level), what materials matter, and what makes your work different. If you use production partners or have multiple people involved, include that too. Shoppers do not need a life story, but they do want to know who they are buying from and what to expect.
Etsy account setup steps: profile, security, and shop preferences
Set shop language, location, and currency
Set these before you build a pile of listings, because changing them later can create cleanup work. Your shop language should match the language you will actually write in for titles, descriptions, and tags. Etsy notes that if your text isn’t in your default shop language, your items may not be properly indexed in search, which is an easy SEO mistake to avoid.
Your shop location helps shoppers understand shipping expectations and can support local discovery, especially if you sell in-person or ship domestically. Be accurate and consistent with what you will use on labels and policies.
For currency, pick the one you price and calculate profit in. Etsy treats shop currency as a universal setting for all listings, and switching later can trigger price conversions and rounding. If you plan to sell internationally, you can still price in one shop currency, while shoppers may see converted display prices.
Turn on two-factor authentication
Before you connect banking and start taking orders, lock down your account. Etsy allows two-factor authentication (2FA) using SMS, phone, or an authenticator app, and provides backup codes you should save somewhere secure. The goal is simple: if someone gets your password, they still cannot access your shop. Etsy’s step-by-step guide is in How to Make Your Account More Secure.
Set up shop sections for easy browsing
Shop sections make your storefront easier to shop and can reduce “I can’t find it” messages. Group listings the way a buyer thinks: by product type, theme, recipient, size, or occasion.
Keep it tidy. Etsy lets you create up to 20 custom shop sections (plus “All items”), each name can be up to 24 characters, and each listing can only live in one section at a time. The how-to is clear in How to Create and Manage Shop Sections.
Payments, taxes, and shop policies to decide before launch
Etsy Payments setup and bank verification
Plan your payout setup before you list, because payment holds and verification issues can delay launch momentum. In most cases, you’ll be paid through Etsy Payments, which means you’ll connect a bank account for deposits and confirm your identity details.
Two practical tips help here. First, make sure the name on your bank account matches the legal name you’re using for your seller account. Second, set a habit of checking your “Finances” area regularly once you open, because Etsy will surface action items there if anything needs re-verification. If you’re opening a shop with a partner, decide up front whose name and bank account will be used so you don’t have to unwind it later.
US taxes to plan for on Etsy
Selling on Etsy is a business activity in the IRS’s eyes, even if it starts as a side hustle. The most important mindset shift is this: track your numbers from day one. Keep clean records for revenue, refunds, fees, shipping, supplies, and mileage so you can calculate real profit and file accurately.
If you’re not sure whether you’re a hobby seller or running a business, or whether you should set aside money for estimated taxes, it’s worth getting advice from a tax pro early. It’s usually cheaper than fixing mistakes later.
Sales tax, income tax, and Etsy tax forms
Sales tax: Etsy may automatically calculate, collect, and remit sales tax on qualifying orders shipped to certain US jurisdictions under marketplace facilitator rules. Even when Etsy remits, some states still require you to file a return or report marketplace sales, depending on your situation and nexus.
Income tax: You generally pay income tax on your profit (sales minus eligible expenses), not on gross revenue.
1099-Ks: Form 1099-K rules have been changing. The IRS has been phasing in lower thresholds, with a published transition timeline of $5,000 for 2024 transactions, $2,500 for 2025, and $600 for 2026 and later. Taxpayer Advocate Service guidance on 1099-K explains the phase-in clearly.
Returns, exchanges, and processing times
Decide your customer service approach before you launch, then bake it into your listings. Your processing time should reflect reality on your slowest week, not your best week. Buyers forgive longer timelines more than missed promises.
For returns and exchanges, be clear about what you accept, the time window, who pays return shipping, and how you handle personalized or custom items. Etsy also expects sellers to set return and exchange information on listings for physical items (even if the policy is “no returns”), and missing policies can hurt visibility in Etsy search. How to set return policies on listings walks through the setup.
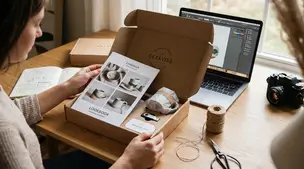
Creating strong Etsy listings: photos, titles, tags, and attributes
Listing photos that drive clicks and trust
On Etsy, photos do most of the selling. Your first photo has one job: earn the click in a crowded search page. Use a bright, sharp image with the product filling the frame and a clean background that matches your brand.
Then build trust with the rest of the photo set. Include a few close-ups, a scale shot (in hand or next to a common object), and a lifestyle image that shows the item in use. If you sell variations, show the options clearly or add a simple labeled photo so buyers do not have to guess. For handmade items, a quick “detail” photo of stitching, texture, or finish often reduces messages and returns.
Titles and keywords that match shopper searches
Write titles for shoppers first, algorithms second. Start with the exact product phrase people search, then add the most important details: material, style, recipient, and occasion, but only if they truly apply. Avoid filler words and cute internal names that shoppers will never type.
A practical pattern is: Primary keyword + key differentiator + use case. Example: “Sterling silver hoop earrings, minimalist everyday hoops, gift for her.” Keep the title readable, because buyers scan fast.
Your keyword research from Etsy search suggestions matters here. If shoppers type “birth flower necklace” more than “botanical charm necklace,” lead with the phrase they use. Etsy’s own guidance reinforces that search phrases should show up across titles, tags, and attributes in a natural way: Keywords 101: Everything You Need to Know.
Use all 13 tags and relevant attributes
Use all 13 tags. Think of tags as additional ways to describe the same item, not a place to repeat the title word-for-word. Mix broad and specific phrases, and include different angles like recipient, occasion, style, and product type. If you can choose between a single word and a multi-word phrase, the phrase usually captures intent better.
Do not skip attributes. Attributes like color, material, occasion, and room are essentially structured keywords, and Etsy uses them to match filters shoppers click. When your attributes are accurate, your listing can appear in more filtered searches, which can raise conversion because buyers are already narrowing down what they want.
As you build listings, keep a simple checklist: clear main photo, consistent photo style, one primary keyword phrase, 13 varied tags, and every relevant attribute selected. That baseline alone puts you ahead of many new shops.
Pricing, inventory, and shipping settings that prevent surprises
Pricing for profit and competitive positioning
Price to stay in business, not just to get the first sale. A solid Etsy price usually needs to cover four buckets: materials, labor time, packaging, and overhead (tools, software, studio costs). Then add marketplace costs like Etsy fees, payment processing, and any advertising spend you choose to use.
After you know your minimum profitable price, sanity-check it against the Etsy search results you reviewed earlier. If your price is higher, make sure your listing communicates why. Better materials, larger size, original design, personalization, gift-ready packaging, or faster turnaround can all justify a premium. If your price is lower, be careful. Underpricing often leads to burnout and inconsistent quality, which hurts reviews and repeat buyers.
Variations, quantities, and SKU tracking
Variations can lift conversion, but only if they’re clear. Use variations for real buyer choices like size, color, finish, scent, or personalization. Keep option names simple, and avoid making shoppers decode internal terms.
Inventory settings matter even for handmade. Decide whether you will list “made to order” quantities or true on-hand stock. Either way, set quantities you can actually fulfill within your stated processing time.
Add SKU tracking early. Even a basic SKU system (product line + size + color) makes it much easier to pack accurately, reorder supplies, and troubleshoot when a buyer messages you about “the one I ordered last time.”
Shipping profiles, packaging, and delivery estimates
Your shipping setup should prevent surprises for both you and the buyer. Shipping profiles help you keep settings consistent across listings, especially if you sell multiple items with the same package size and carrier.
Before launch, do a test pack. Assemble the exact packaging you will use, then measure and weigh it. That one step prevents the most common shipping problem: undercharging because you priced based on the product, not the packed box.
Finally, be realistic about delivery estimates. Buyers mainly care about two things: when you ship (processing time) and whether tracking is included. If you offer upgrades or free shipping thresholds, make sure the math still works with heavier orders and farther zones. Consistency here protects your profit and your reviews.
How to optimize your shop for Etsy search and first sales
Improve conversion with trust signals and clarity
Etsy search rewards listings that shoppers click and buy. So your “optimization” is not just keywords. It’s also clarity and trust.
Start with the basics shoppers look for fast: crisp photos, a title that matches the product, a first line of the description that confirms size or what’s included, and a realistic processing time. Add the details that prevent hesitation, like materials, dimensions, care instructions, and how personalization works.
Trust signals add up quickly on Etsy. Respond to messages promptly, keep shipping on time, and package well. Even before you have many reviews, a polished storefront and clear policies can make your shop feel established.
Promote your shop with socials, coupons, and Etsy Ads
Promotion works best when it sends the right traffic to your best listings. Post the same product a few ways on social media: a clean product shot, a short “making” clip, and a quick gift idea. Keep the link consistent so people land on the exact item you showed.
Coupons can help without discounting your whole brand. A small “thank you” coupon for repeat buyers or a limited-time launch offer often feels more intentional than constant sales.
Etsy Ads can also help you test demand, but treat it like a learning tool. Start with a small daily budget, advertise only your strongest listings, and give it time to collect data. Etsy also has a short waiting period after opening a shop before Etsy Ads becomes available, so plan around that with organic promotion first. You can review current options in How to Promote Your Etsy Shop.
Encourage reviews and repeat customers ethically
Reviews usually come from a smooth experience, not a perfect product. Ship when you promised, communicate early if anything changes, and include a simple package insert that thanks the buyer and explains care instructions.
After purchase, use Etsy’s built-in “message to buyers” to set expectations and reduce confusion. Avoid pressuring language. A polite reminder that reviews help small shops is fine, but never offer discounts or gifts in exchange for a review. That’s the kind of shortcut that can backfire.
Related posts
Keep reading
How to Create a Press Kit for Your Etsy Shop (What to Include)
Etsy press kit checklist: brand story, high-res product photos, logos, pricing, shop links, and contacts so journalists and bloggers feature your work fast.
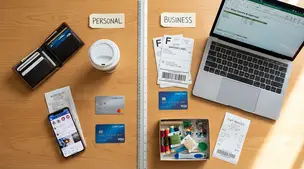
How to Separate Personal and Business Finances for Your Etsy Shop
Separate personal and business finances by using a dedicated bank account and card, tracking Etsy fees and payouts, and keeping clean, tax-ready records.

How to Protect Your Etsy Shop From Scams and Phishing
Etsy phishing scams: spot fake support messages, QR-code traps, and off-platform payment requests, then lock down your account with 2FA and spam reporting.

How to Create a Production Workflow for Your Etsy Shop (SOP Template)
Production workflow for your Etsy shop with an SOP template: map order intake to making, QC, packing and shipping, with roles, tools, and ship-by timing.

Etsy Pattern vs a Standalone Website: Which One Fits an Etsy Seller?
Etsy Pattern vs standalone website: compare costs, control, SEO, customer emails, and integrations to decide when to stay synced with Etsy or go independent.

How Etsy Payments Work for Sellers
Discover how Etsy Payments pays sellers—payout schedules, payment methods, fees, taxes, deposits, and tips to keep your handmade shop cash flow happy.